


Have you put a lot of work into building a nice website on Webflow just to realize it can't handle everything you need? Or maybe you want more customization options, easier e-commerce operations, or better ways to optimize your site for SEO.
If that sounds familiar, consider moving your Webflow site over to WordPress. But moving all your content between platforms sounds intimidating, doesn't it?
So, where do you get started when you don’t know how to migrate from Webflow to WordPress?
Well, it takes some careful planning and steps. First, you back up all the files and data, export them, find a host to set up a new WordPress site, and install the WP All Import plugin. Then, you use that plugin to import your Webflow site data and elements accordingly.
You also need to take care of redirecting users to the new site, testing to make sure everything looks right, and cleaning up loose ends after the switchover.
We know that all sounds complex, but we’ll walk you through each step in detail to make things easy for you. So, hop right in.
Preparing for the Migration
Before you start the actual migration process from Webflow to WordPress, there are a few things you'll want to get sorted out first. Taking the time upfront to prepare makes the actual move go a lot smoother.
Find a Hosting Provider
First, you'll need to pick where you'll host your site. As WordPress doesn't offer native hosting like Webflow, choosing a good provider is key.
Look for companies with solid customer service, security, high uptime guarantees, and good compatibility with WordPress. You may also want to consider managed hosting options where they handle all the technical stuff.
Then, just buy a plan that fits your budget. Hostinger, GoDaddy, and Bluehost are some reliable hosting providers out there.
Back-Up Your Webflow Site Data
It's also a good idea to back up your Webflow site, just in case, even though you won't literally be moving any content from Webflow to WordPress. You’ll have to do the downloading and uploading manually when setting up the WordPress site.
To save a copy in Webflow, hit Cmd + Shift + S on a Mac or Ctrl + Shift + S on Windows. Webflow will then ask for a description, so type that in and click save. You can check the backup under Settings > Backups.
Webflow also lets you export all your HTML, CSS, images, and CMS stuff zip files. So, to help with the transfer, organize it into clearly labeled folders before downloading.
How to Migrate From Webflow to WordPress: Step-by-Step Guide
After you have prepared your Webflow data and found a suitable WordPress hosting plan, it’s time to migrate everything over. Here are the steps to follow:
Step 1: Install WordPress on the New Hosting
First up, you’ll need to set up WordPress on your new hosting account. How this works depends on your host, but most make installation pretty simple these days with one-click installs.
Step 2: Customize Your New WordPress Site
Once that's done, start customizing your WordPress site. You'll want to pick a theme similar to what you used on Webflow so the transition is smooth. Then, tweak the colors, layout, and all that stuff to match your branding.

Build out the standard pages too - like the homepage, about us, contact, and so on. The WordPress editor makes putting pages together pretty straightforward without coding.
Also, check out some plugins to beef up your site's functionality. Look on WordPress, ThemeForest, and Envato for things that could help, such as e-commerce plugins if you sell products, form builders for contact pages, or SEO optimizers.
Step 3: Export Your Webflow Site Content
Next is exporting your Webflow content. The process is pretty easy, but you can’t quite export everything, except web pages, blog posts, text blocks, embedded components, galleries, and images.
To grab your content, head to the CMS Collections panel in your Webflow designer. This shows all the files and data on your Webflow server.
Now, select the collection one by one as needed. For example, we can choose blog posts and click the export button at the top. Doing this saves a CSV file on your computer.
Repeat this process to grab the other staff. The codes and images will be saved in zip format.
Step 4: Import the Exported Content to WordPress
Okay, with everything exported from your Webflow site, it’s now time to upload them to WordPress. Unfortunately, though, the latter doesn’t natively allow site content uploads unless they are in the XML format. And the blog posts you exported from Webflow are in CSV format.
Does that mean we’ll need to import everything manually?
No. We’ll do it using the WP All Import plugin. It converts your exported CSV files into a format WordPress understands.
- Install the WP All Import Plugin
You can add the plugin to your WordPress site manually or download it from the WordPress plugins store. You can search for it on the Plugins Store from Plugins » Add New from the dashboard.
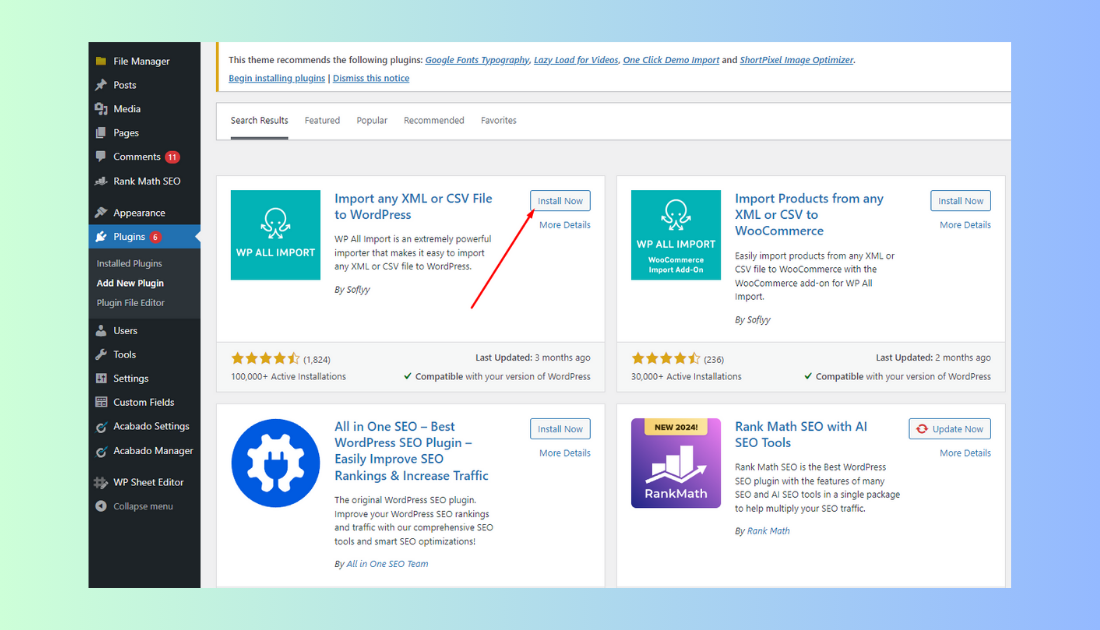
Once you’ve found it, simply click Install and then Activate. It should appear in your WordPress dashboard menu.
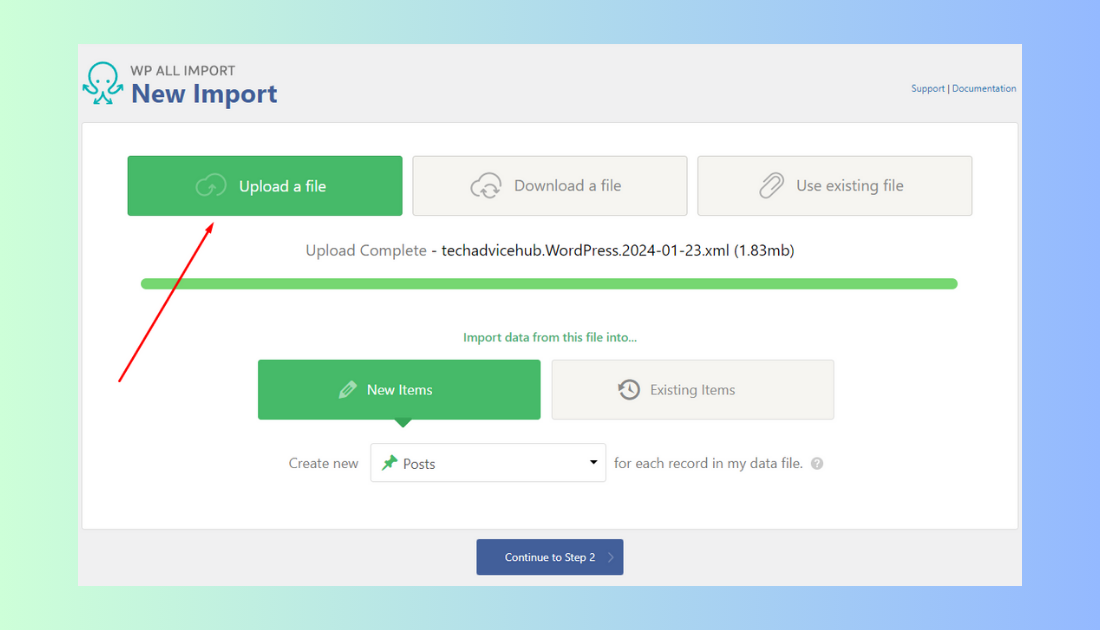
- Upload the Exported File
Now, to use the plugin, go to All Import » New Import and click Upload. Here, you’ll have to upload the CSV file you’ve already exported for your blogs on Webflow.
- Sort the Uploaded Content
Once uploaded, the plugin will ask you to drag and drop the data columns into the corresponding fields for your WordPress content.
For example, you’ll have to drag the post name from the right side into the title field and move the post body into the appropriate area.
.png)
You can also assign categories, tags, authors, and all that while you're mapping fields. The settings will apply to every post being imported, too, so you won't have to repeat the process individually.
.png)
- Confirm Importing Content
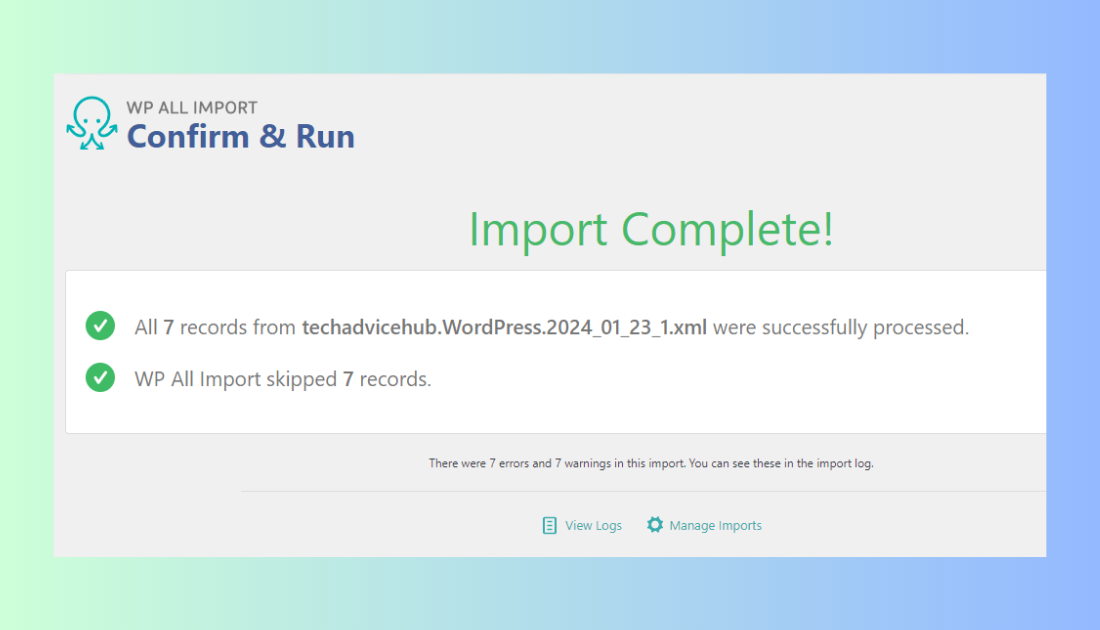
Next, the plugin will auto-detect an ID or you can generate one. Then click "Confirm & Run Import" and you're set.

.png)
The plugin will let you know when it's all done.
Don't forget to repeat for any other collections you exported before checking your imported content from the Posts or Pages sections in the dashboard.
Step 5: Handling Images While Importing to WordPress
Adding images to your WordPress site requires a different approach than adding other content. This is because the platform will neither upload nor align the images with their posts automatically.
Now, as you'll have to upload images manually, it’ll take some time and effort, especially if the Webflow website has a lot of pages and images. But using a plugin like Auto Upload Images can be an easier gateway for doing this. Here’s how you’ll want to go ahead:
- Configure Auto Upload Images
First, go into the Auto Upload Images settings in your WordPress dashboard to configure how you want things to work. You can set the base image URLs, what to call the files, add Alt captions, and more.

- Upload the CSV File
Once that's set, go to the Auto Upload Images tool and select the CSV file with all the image URLs in it. Click upload, and the plugin will start bringing them over. You can watch the progress as it finds the pics in the file and uploads them. It'll tell you when it's done and how many got uploaded successfully.
- Review the Uploaded Images
After it finishes, check out the Media section to confirm the photos uploaded correctly. Then, take a look at your posts and pages to ensure the images are showing up where they should.
Step 6: Control and Organize Your Imported Content
Once all the images and posts are in WordPress, it's time to get everything organized, so your site looks similar to how it was set up before.
WordPress gives you full control over arranging stuff however you want. You can categorize posts, make custom menus, and add tags or categories to everything to make your site super easy to navigate for both you and visitors.
You can also use plugins to tidy up things further. We’d recommend the Bulk Edit Posts plugin which lets you edit large groups of posts from a spreadsheet. That can speed things up massively if you have a lot to go through.
Step 7: Set Up Your WordPress Permalinks
The next thing to configure is how your WordPress URLs will be set up. To access this, go to the Settings area in your dashboard and click on Permalinks. There you'll see some different options for structuring your site's URLs.
We'd recommend selecting the "Post name" structure. This will make your URLs look something like "yourdomain.com/the-page-or-post-slug."
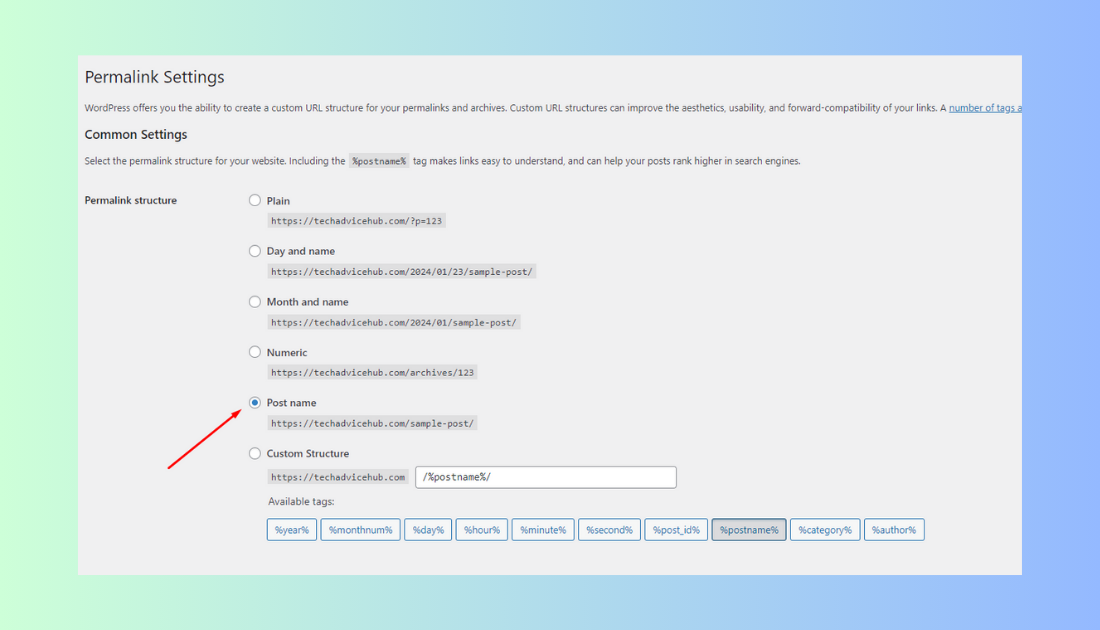
Having short, clean URLs like that can give your SEO a huge boost. Plus, since you've already set slugs for pages in your previous site, keeping that structure here should make it easy for people to remember old URLs and keep linking to your new content.
Once you pick ‘Post name,’ click Save Changes.
Step 8: Redirect Your Domain to WordPress
Even though you imported all your content into WordPress, your domain (like mysite.com) still points to your old Webflow site. So, you need to update the DNS settings to point it to your WordPress host instead.
Here’s how to do this:
- First, log into your Webflow account and go to the domain settings for the one you want to redirect.
- There, you'll see an option to set up the redirect - just enter your new WordPress URL as the destination.
- Once that's saved, test it out by going to your domain in a browser. It should forward straight to WordPress now.
The exact steps may vary a little depending on your registrar or host, so be sure to check their help sections if you get stuck. Also, you can ask about any particular queries in dedicated forums and discussion threads for both platforms, like this guy did on Reddit.
How to Migrate from Webflow E-Commerce to WooCommerce
Migrating an e-commerce site from Webflow to WooCommerce involves a pretty similar process to what we've outlined above. But there are some additional specifics you should keep in mind when dealing with products and orders.
.png)
Exporting Your Product Data from Webflow
Start by exporting your Webflow e-commerce data just like you would with your blog posts. This will often include product information, images, prices, SKUs, and inventory levels.
- Head to the dashboard and go to the "Products" section in the sidebar.
- Click the "Export" button in the top corner to save everything like product names, images, prices, and more to a CSV file.
Don't forget to also export any discounts or past orders at the same time using the same method.
Importing Products into WooCommerce
WooCommerce has an importer built right into it, so you can use it to upload the CSV file you exported from Webflow. This tool also lets you map the product data to the appropriate fields within WooCommerce.
- On the WooCommerce dashboard, look for the "Products" option and click “Start Import.”
- Select the CSV file you created from Webflow. The import tool here will map all your product info to the proper WooCommerce fields.
- Next, use the drop-down menus to match things up between Webflow and WooCommerce.
For example, product name matches to product name, SKU to product ID, description to description, categories to categories, main image to featured image, and so on.
- When everything looks paired up correctly, click "Run Importer" and watch the progress.
After it finishes, your products should be loaded into WooCommerce and ready to go.
Wrapping Up
So, that’s that. If you had no clue about how to migrate from Webflow to WordPress before reading this guide, hopefully now you feel more confident in tackling the task.
As you can see, breaking it down step-by-step makes the whole process pretty straightforward. It just takes some patience and paying close attention to details as you export, import, map fields, and set redirects.
And don't stress if any part takes some extra troubleshooting - there are loads of help out there from forums, tutorials, and communities if you hit a snag.
Just move through it section by section, and before you know it, you'll have a fully migrated WordPress site looking better than ever, with all your Webflow content imported safely.

About Flowzai
At Flowzai we craft beautiful, modern and easy to use Webflow templates & UI Kits.

Got A Project In Mind?
Reach out today, and let's make something amazing together.
