


Webflow is well-known for designing service pages, especially for adding interactive CTA buttons. However, if your potential clients can't easily book appointments, you're likely to lose leads permanently. Setting up a booking calendar helps big time in such cases, but doing that with Webflow’s native workflow is quite tricky.
Wouldn't it be nice if you could embed a scheduling tool like Calendly that handles everything behind the scenes?
The great news is you can embed Calendly appointment scheduling directly into Webflow in just a few steps. By adding a simple code snippet, you can enable your site visitors to view your availability and pick times for calls without leaving your site. And such a smooth booking experience can help capture more leads.
Let’s show you how to add Calendly to Webflow in easy steps, so you can optimize your workflow and never miss a beat—or a client call.
Step-by-Step Guide to Embedding Calendly in Webflow
Calendly’s embeddable widget makes integration seamless. Just follow these steps to get it working on your Webflow site:
Step 1: Set Up Calendly
First, you'll need a Calendly account. If you haven’t one, head to calendly.com and sign up for free. The free account lets you sync with other calendar apps, like Google or Apple Calendar. This is handy for getting started with your existing schedules. They also have paid plans if you need more controls.
Once you've signed up, do the following:
- Navigate to the "Event Types" tab and create an event type
- Choose a preferred meeting duration (e.g., 15, 30, or 60 minutes).
- Then, all you have to do is copy the generated link.
- You can also personalize your scheduling page as you like. For example, you can name the event, add location, description, change the event color, and more.
Step 2: Get that Embed Code
After setting up your event type and messing around with the styles, it's time to grab the embed code. Go back to your Calendly dashboard and:
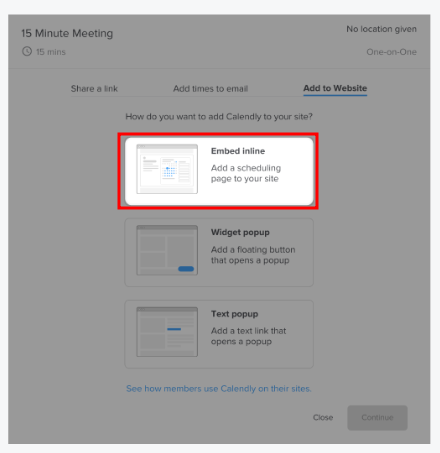
- Click "Share" next to your event
- Select "Add to Website"

- Choose "Embed Inline" for a seamless experience on your Webflow site
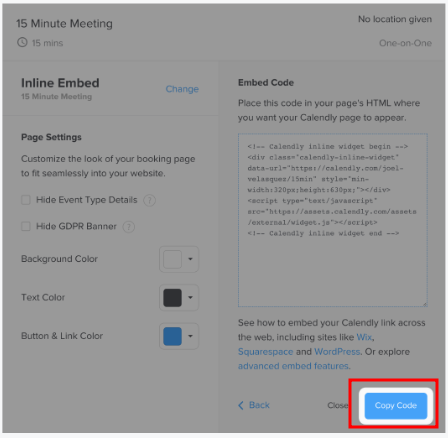
- Tweak any settings if you want. For example, you can change the button background, text, or link colors and show or hide event details or banners.
- Copy that HTML snippet
Step 3: Paste it into Webflow
Now, let’s paste that code into your Webflow site:
- Go to the Webflow Designer Dashboard
- Find the page you want the widget to show on
- Drag an "Embed" element onto it
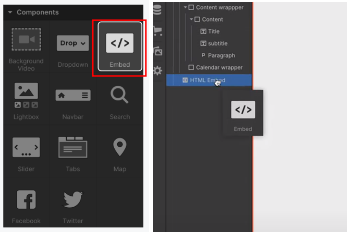
- Paste the HTML into the code box.
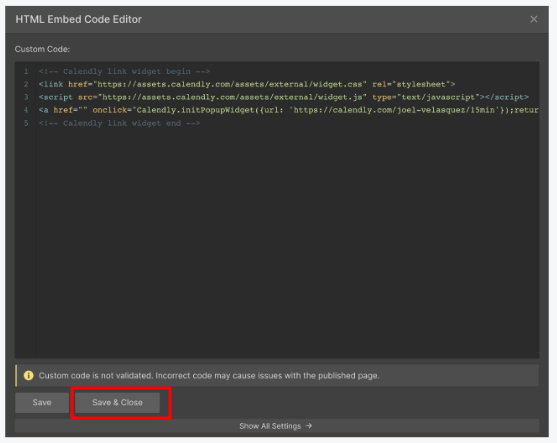
- OoooIf your site has a button to enter the scheduler link, you’ll have to paste it under that button’s code box.

- Publish your site to make the changes live
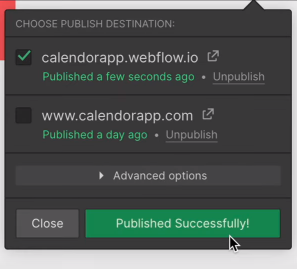
The Calendly scheduler should now show up seamlessly on your site. Visitors can book right from the link you’ve just created.
Step 4: Add a Pop-Up Widget
The pop-up widget makes booking even more accessible since it doesn't take people away from your site. To add it:
- Go back to your Calendly dashboard
- Click "Share" again
- This time, choose the "Widget Popup" option
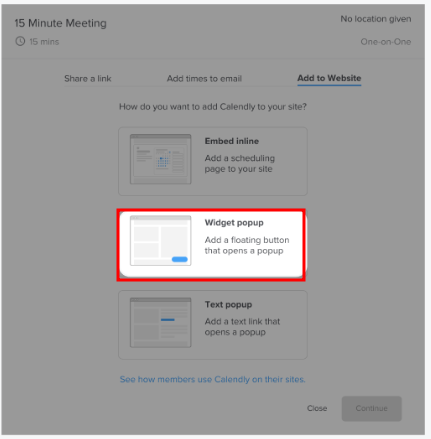
- Customize the settings how you want
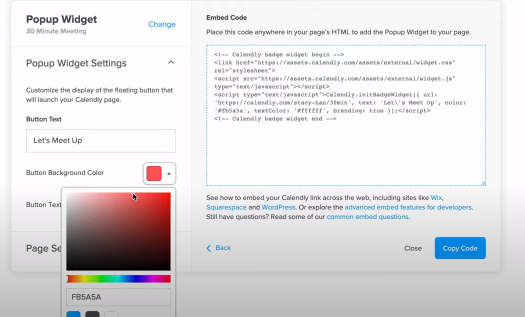
- Copy the HTML snippet
It's basically the same process as the inline embed to put it into Webflow:
- Drag an "Embed" element where you want the button
- Paste the pop-up code there
- Make a button to trigger it
- Add the onclick attribute with the trigger function
- Save and publish
Now, when someone clicks the button, the booking window will pop right up on the page.
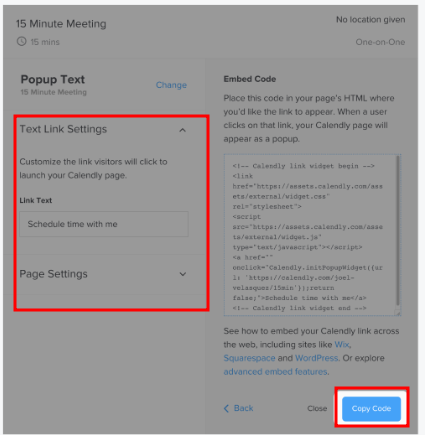
Step 5: Customize the Pop-up Text
Now that the pop-up widget is live, you'll want the text to match your brand’s voice and vibe. Here's how to tweak it:
- Go back to your Calendly dashboard
- Look for the event you created
- Find the "Text Popup" settings
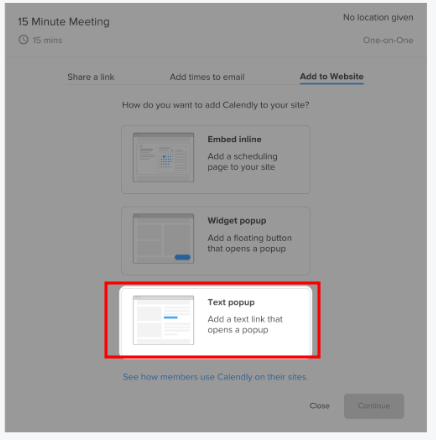
- Mess around with the wording to your liking, copy the code in the same way you did before, and paste it to the embed.
Personalizing it will make people understand that it matches your brand's vibe. So, keep experimenting until it feels right.
A Few Things to Keep in Mind
When integrating the Calendly widget into your Webflow site, there are some critical considerations to ensure a smooth process:
- Be sure to test everything works right across different devices - on phones, tablets, whatever people use. You'll want it looking good everywhere.
- Remember that for any tweaks you make in Calendly, you'll need to copy that HTML back into Webflow again to see the changes. Otherwise, it won't update.
- Double-check the time zones so they’re properly set. The last thing you want is for times to show up wrong for you or people booking appointments.
- Also, pay attention to how it looks visually - make sure the styles blend in with your site design so the experience feels consistent overall. Tweak colors and fonts if needed.
- With Calendly handling the calendar side, you can keep all bookings and RSVPs in one easy place to manage scheduling from there.
Frequently Asked Questions
Do you have further queries regarding adding Calendly to Webflow? Here, we’ve answered a few commonly asked questions that might help.
How much does Calendly cost?
Calendly has different pricing options, including a free one, which is perfect for basic scheduling. It allows unlimited bookings with embedding links for one event type. The paid tiers are within $10-$16/month and offer more features like additional event types and app integrations. You can find more details here.
Can I use Zapier to integrate Calendly into Webflow sites?
Sure, you can. Zapier allows automating things like taking scheduled appointments from Calendly and adding them into a CRM tool. To set this up, check Calendly and Zapier's support pages - they have guides showing how to integrate the services. Here’s a brief you can check out before going ahead.
Will the Calendly pop-up widget slow down my Webflow website?
It’s unlikely that the widget will significantly slow down your Webflow site. As with any extra code, it could potentially affect speed a tiny bit. But Calendly builds their widget to have minimal impact. And of course, the overall site performance depends more on things like image optimization, file sizes, caching, etc. It's worth checking your site speed before and after with Google PageSpeed Insights.
Wrapping Up
And that’s that. If you didn’t know how to add Calendly to Webflow, you now have a simple guide to get you started.
Integrating Calendly not only simplifies your scheduling process but also improves the overall user experience on your website. Don't underestimate how much a handy booking feature can help turn website visitors into happy customers.
Be sure to keep both Calendly and your Webflow site updated, pay attention to user feedback, and refine things over time. A well-oiled scheduling process could seriously boost your business.

About Flowzai
At Flowzai we craft beautiful, modern and easy to use Webflow templates & UI Kits.

Got A Project In Mind?
Reach out today, and let's make something amazing together.
