


Capturing email addresses is quite easy with Webflow’s drag-and-drop forms. But sending those leads to your mailing list automatically needs a lot more work. Yet, you can make Mailchimp’s powerful email marketing platform do the job for you by linking it to your Webflow site.
The Webflow Mailchimp integration process is pretty straightforward. You’ll just have to connect the Webflow site to Mailchimp, generate Mailchimp’s integration code, and paste it into the Webflow form. With this setup, each new contact gets added directly to your mailing list without leaving your site.
Let’s walk you step-by-step through exactly how to integrate Mailchimp with Webflow to help you transform signups into success stories. First, we'll link up the two platforms, and then integrate the forms in two ways.
Linking Your Webflow Site to Mailchimp
Integrating your Webflow forms with Mailchimp begins with hooking up the two platforms. Here’s how you’ll do it:
Step 1: Get Set Up With Mailchimp

Before anything else, you'll need to get your Mailchimp account set up. If you already have one, you're good to go - just skip to the next step. But if you're starting anew, follow these simple steps:
- First, head to mailchimp.com and click the "Sign Up" button at the top-right.
- Choose your preferred plan from the four available options. Start for free if you want to.
- You'll see a quick form asking for your name, email address, and password. Fill it all out and click "Sign Up."
- After that, check your mail inbox for a confirmation email from Mailchimp. Just click the given link in there to activate your account.
Step 2: Get the Integration Code from Mailchimp
With your Mailchimp account activated, it's time to connect it to your Webflow site. This requires you to grab a special integration code from Mailchimp.
- First, log into Mailchimp and click on the "Audience" tab under your profile icon menu.
- The following page will give you many options on the left panel. From there, click “Integrations” and choose “Manage under it.
- You’ll now be presented with several platforms to integrate. However, you’ll have to choose “Custom Website” since Webflow isn’t listed there.
- Under the ‘Get Custom Website Code’ section, paste the URL for your Webflow site and click "Get Code."
- It'll generate a code for you - copy that to your clipboard.
Step 3: Paste the Code into Webflow
To finalize the link-up, you’ll need to paste the code you just grabbed from Mailchimp into your Webflow project. Go ahead this way:
- Navigate to your Webflow dashboard and select the project you’re integrating with Mailchimp.
- Go to the ‘Project Settings’ and select the ‘Custom Code’ tab within the settings menu.
- You will now see a ‘Head Code’ box. Paste the code that you copied from Mailchimp here.
- Click ‘Save Changes’ and wait for the confirmation pop-up before publishing your site.
Step 4: Test Your Integration
You’ve already linked the two platforms, but it’s always wise to check if everything’s working as it should. Here’s how to test your work:
- Publish your Webflow site.
- Go back to Mailchimp’s ‘Custom Website’ page, where you got that integration code, and click the ‘Check Connection’ button.
- If you’ve done things right, you’ll see something like the picture below, confirming the two platforms are perfectly linked up.
Integrating Webflow Forms with Mailchimp
With your site linked up to Mailchimp, it's time to start capturing those email signups.
As we mentioned, there are two basic ways to do this. You can create a form directly in Webflow and set it to send form submissions to Mailchimp. Or, you can embed a Mailchimp form into your Webflow site.
Let’s begin with the second option, the easier of the two.
Embedding a Mailchimp Form into Your Webflow Site
Mailchimp lets you create a very basic form to embed directly onto your Webflow website. It may not look that impressive, but gets the job done nonetheless.
- To start, go back into your Mailchimp dashboard. Under the ‘Audience’ section, you’ll find ‘Sign-up forms.’ Click that.
- Now, from the right-side menu, select ‘Embedded forms.’
- The following screen will present a few options to structure your form. For example, add or remove form fields like First Name, Company, or Phone number. Play around and set up the form as you prefer.
- Once your form is ready, click continue at the top-right corner.
- Your Mailchimp form’s embed code will now show up. Copy it.
- Now, head over to your Webflow project and add an embed by dragging it from the left menu panel. Paste the copied code into the embed.
- Finally, save and close the embed and publish your site.
Integrating Custom Webflow Forms to Sync with Mailchimp
Just as we said at the beginning, designing custom forms in Webflow is super easy with the drag-and-drop builder. And they also end up looking much better than Mailchimp’s embedded form.
So, if you’ve already built one, here’s how you’ll want to configure it to send its data directly to Mailchimp:
- 1. Although you’re linking the form made in Webflow, you’ll still need to create the Mailchimp form. And that is only to match the form fields for a proper sync setup. So, repeat the first three steps from the section above to get the corresponding form field names ready in Mailchimp.
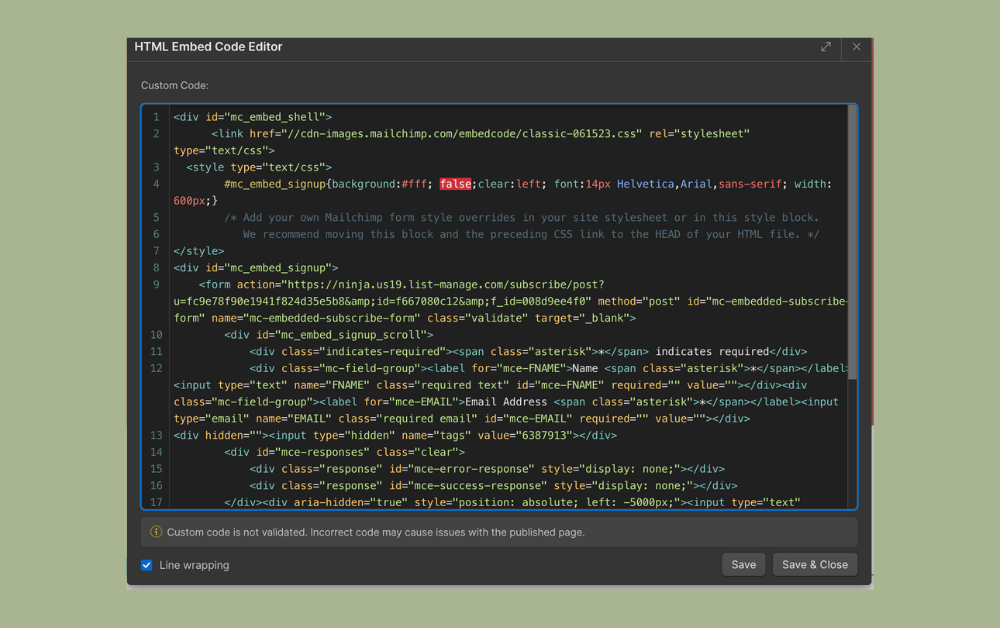
- 2. When you reach the ‘Your form is ready!’ page with the code box in the display, copy only the action code instead of the entire code. The action code is the URL between <form action" and " method.
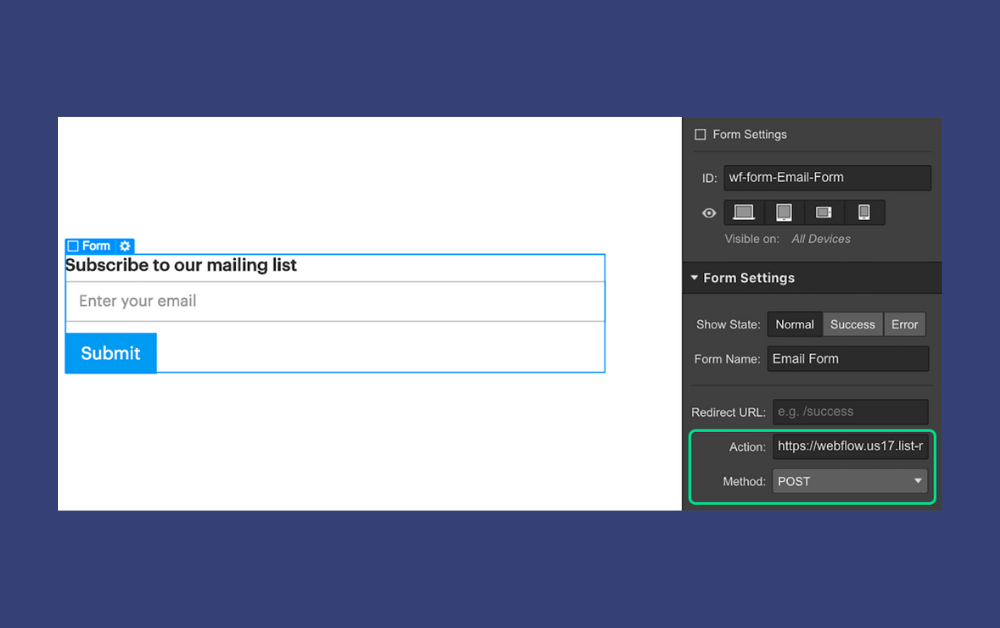
- 3. Now, go back to Webflow and select the form layout. Paste the copied URL (action code) into the “Action” field under the “Form Block Settings” in the right-side panel (Settings menu). Select Post as the Method.
- 4. Now, it’s time to link the form fields. For this, go back to Mailchimp’s code box and copy the field names that match those in your Webflow form. For example, if your form has First Name and Email, you’ll need to copy FNAME for First Name and EMAIL for Email.
- 5. Paste the field names into the corresponding text area under ‘Text Field settings’ in the right-side panel. Also, be sure to choose the type accordingly. For example, for email, you need to choose Email instead of plain. Likewise, for phone numbers, you’ll need to select Phone.
- 6. And that’s that. Go ahead and publish your site.
Test Your Integration
Before going live with your newly integrated signup form, you should do some test runs to ensure everything's in order. You don't want your potential subscribers to hit any snags. Here are the steps you could follow:
- Fill out the form on your site with some test info. Using fake names with made-up details will do.
- Head back to your Mailchimp dashboard. Go to ‘All Contacts’ under ‘Audience’ and check if those details were added correctly.
- If the information appears as it should, then congrats - your integration passed the test!
- But if not, no worries. Just double-check that your Webflow fields are mapped correctly to the Mailchimp ones.
A Few Things to Keep in Mind
Now, before you jump into Webflow forms building, here are a few tips to keep your Mailchimp integration running smoothly:
- Always test your form integration whenever you tweak any site code. Even small bugs can cause connection issues.
- Avoid using stuff like "sales@" or "admin@" addresses. Mailchimp bans those role-based emails.
- The free Webflow plan won't let you embed third-party integration codes like the one in Mailchimp forms. You'll need an upgrade.
- Double-check if any field has an incorrectly-typed name. A little typo could mess things up.
- Add success and error messages in your Webflow forms so users know it worked (or didn't).
- Check spam folders regularly in case legitimate signups get lost.
- If your form has special fields, like file uploads or multi-select options, read Mailchimp's help on support.
- GDPR and privacy laws are super important if you've got EU subscribers. Try to stay compliant.
Frequently Asked Questions
Have you got further queries regarding Webflow Mailchimp integration? Here, we’ve answered a few commonly asked questions that might help.
Can I use external platforms like Zapier and Make.com to integrate Mailchimp with Webflow?
Sure, you can. Both Zapier and Make .com (formerly Integromat) let you automate moving data between Mailchimp and Webflow. For this, you’ll need to set up "Zaps" and "Scenarios" to sync your forms seamlessly without any coding. Check out their respective websites for detailed guides.
Does Mailchimp integration impact my Webflow site’s performance?
Typically, no. Basic integrations shouldn't affect your Webflow site’s speed. But large/complex forms could add load time. The more you add scripts, the slower things get. You should keep forms lean, optimize assets, and test speeds regularly to prevent such issues.
Will Webflow sync any custom fields I add to my forms?
Custom fields should sync up with no problem. You just need to ensure the names match identically in Webflow and Mailchimp. Keep a close eye when copying a field for a field to route data correctly. When setting up the form in Webflow, use the exact field names (tags) provided by Mailchimp for each custom field.
Wrapping Up
Having Mailchimp's lead-grabbing forms combined with Webflow's slick templates and builders is a winning combo for growing your audience. As well as capturing more leads, Mailchimp makes storing and organizing all those contacts a breeze.
And as you can see, the Webflow Mailchimp integration is fairly straightforward once you get the hang of it. Just remember to always double-check so everything is in sync, do your form testing regularly, and update things as your sites or lists change.
Be sure to keep up with what's new in Mailchimp, too. Their features and integrations are always improving. So long as you pay attention to details, your forms will run smoothly, and subscribers will flow.

About Flowzai
At Flowzai we craft beautiful, modern and easy to use Webflow templates & UI Kits.

Got A Project In Mind?
Reach out today, and let's make something amazing together.
